How to Shoot Macro Photos on iPhone (Sharp, Every Time)
Macro photography — filling the frame with something tiny, like the veins of a leaf or the eye of an insect — is one of the most rewarding things you can do with an iPhone. It’s also where most people’s shots come out blurry. The fix is rarely a steadier hand. It’s knowing which lens to use, how to lock focus, and how to light a subject that’s two centimetres away.
This guide walks through the whole process, from picking the lens to confirming the shot is sharp before you press the shutter.
TL;DR — To shoot a sharp macro photo on iPhone: switch to the Ultra-Wide (0.5x) lens, get to about 2 cm from your subject, lock the focus so it stops hunting, keep the phone steady, and light the subject from the side. The single biggest cause of blurry macro shots is autofocus drifting at the moment you press the shutter — locking focus solves it.
First, know what your iPhone can actually do
Every iPhone lens has a minimum focus distance — how close it can get before it physically can’t focus anymore. This is the fact that decides everything about macro:
- Main / Wide (1x): focuses from about 10–12 cm. Great for everyday photos, useless for true macro. If you try to shoot a coin filling the frame on 1x, it will never lock.
- Ultra-Wide (0.5x): on iPhone 13 Pro and later, this lens has autofocus and reaches roughly 2 cm. This is the lens that does real macro.
- Telephoto (5x / 3x): a long minimum focus distance — not a macro lens, though it’s useful for shooting small things from farther away.
So the rule is simple: for true close-up macro, you use the 0.5x Ultra-Wide, not the 1x main camera. People who think their iPhone “can’t focus up close” are almost always on the wrong lens.
A note on models: the Ultra-Wide with autofocus arrived on iPhone 13 Pro. On non-Pro iPhones (XR, 11, 12, 13, and similar), the Ultra-Wide has no autofocus, so its close-focus limit is around 10 cm — closer subjects than that will be soft no matter what you do.
Step by step: a sharp iPhone macro shot
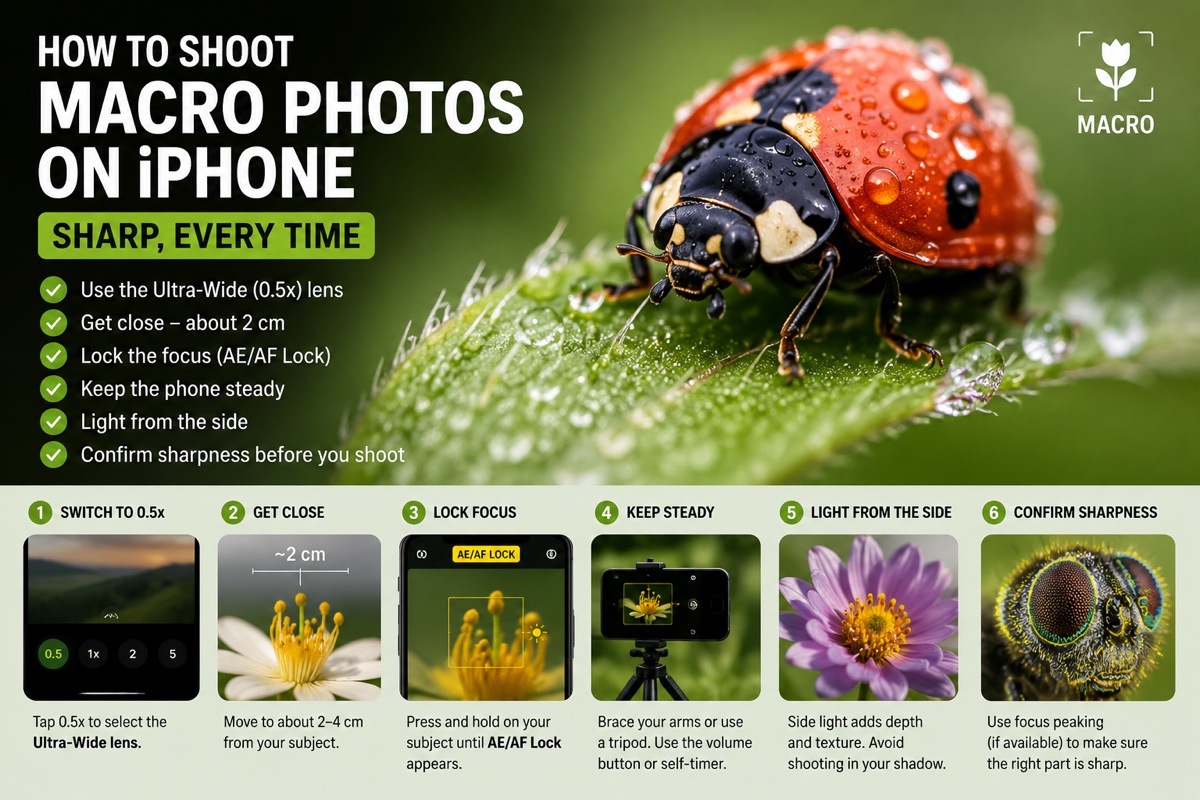
1. Switch to the 0.5x lens
Tap 0.5x in the camera to select the Ultra-Wide. On iPhone 13 Pro and later, the phone may do this automatically as you move in — but doing it yourself means you stay in control of when it happens, instead of the camera jumping between lenses as you move.
2. Get close — really close
Move the phone to about 2–4 cm from your subject. This feels closer than it looks; you’ll often be almost touching it. The closer you are, the more the subject fills the frame and the more dramatic the result.
3. Lock your focus
This is the step almost everyone skips, and it’s the one that matters most. Up close, depth of field — the slice that’s actually in focus — is razor-thin, often a millimetre or two. Continuous autofocus reacts to the tiniest movement and “hunts,” so it’s frequently mid-adjustment at the exact moment you shoot. That’s your blur.
In the stock camera, press and hold on your subject until AE/AF Lock appears, then don’t move. For finer control, a manual camera lets you set focus with a slider and it stays put.
4. Steady the phone
At macro distances, a tiny movement is a big movement in the frame. Brace your elbows against your body or a surface, or use a small tripod. Use the volume button or the self-timer to fire the shutter so you don’t shake the phone by tapping the screen.
5. Light it from the side
Because you’re so close, your own phone often shadows the subject. Move so the light comes from the side rather than over your shoulder — side light also reveals texture, which is what makes macro shots feel three-dimensional. On dim subjects, the torch can help, but soft daylight from a window almost always looks better.
6. Confirm sharpness before you shoot
The hardest part of macro is knowing whether you actually nailed focus on the right millimetre. Focus peaking — an outline that highlights whatever is currently in focus — tells you at a glance, so you’re not chimping through 30 near-misses afterward. If your camera app offers it, turn it on.
The mistakes that cause blurry macro shots
- Shooting on 1x. The main camera can’t focus close enough; it will never lock on a tiny subject. Switch to 0.5x.
- Letting autofocus run free. It hunts at close range. Lock focus, then hold still.
- Moving after you focus. Even a centimetre of sway shifts your subject out of that thin focus plane. Lock, freeze, shoot.
- Front lighting. Light over your shoulder flattens the subject and casts your phone’s shadow on it. Go side-on.
- Tapping the screen to shoot. That tap shakes the phone. Use the volume button or timer.
If the phone never enters macro in the first place, with no flower icon and no lens switch, none of these are your problem. That’s macro mode not turning on, and it has its own set of causes.
When the built-in camera isn’t enough
The stock Camera app can shoot macro, but it makes two decisions for you: which lens to use, and where to focus. Up close, those two decisions are exactly the ones you want to make yourself. That’s the gap Macro Camera Pro fills:
- Lens lock — pick the Ultra-Wide (0.5x) and it stays there. No surprise switching mid-shot.
- Manual focus slider — set focus precisely and it holds, instead of hunting.
- Focus peaking — a highlight, in a colour you choose, that shows what’s sharp before you press the shutter.
- Torch, timer, and manual exposure — the rest of the controls that let you repeat a good shot instead of chasing it.
These manual controls work on any recent iPhone running iOS 18. Getting down to that true ~2 cm close-up additionally needs the autofocus Ultra-Wide found on iPhone 13 Pro and later — on other models you still get full manual control, just at a slightly greater working distance.
It’s a 5-day free trial, no subscription.
Quick reference
| Situation | What to do |
|---|---|
| Subject won’t come into focus | You’re on 1x — switch to 0.5x (Ultra-Wide) |
| Photo blurs the moment you shoot | Lock focus, then hold still |
| Camera keeps changing lenses | Lock the lens, or turn off Auto Macro in Settings → Camera |
| Subject looks flat | Light it from the side, not the front |
| Not sure what’s sharp | Use focus peaking to confirm before shooting |
| Whole frame is soft | Steady the phone; use volume button or timer to shoot |
Frequently asked questions
How close can an iPhone focus? It depends on the lens. The main Wide camera focuses from about 10–12 cm. The Ultra-Wide macro lens on iPhone 13 Pro and later focuses from roughly 2 cm.
Which iPhone lens is best for macro? The Ultra-Wide (0.5x). It is the only lens with a short enough minimum focus distance for true close-ups. The 1x main camera cannot focus close enough, and the telephoto is built for distance.
Why do my iPhone macro photos come out blurry even when I’m close? Almost always because autofocus is hunting. At macro distances the in-focus slice is barely a millimetre or two, so continuous autofocus is often mid-adjustment when you shoot. Locking focus fixes it.
Can non-Pro iPhones shoot macro? Not true 2 cm macro — the autofocus Ultra-Wide arrived on iPhone 13 Pro. Non-Pro models can shoot close-ups at around 10 cm and still benefit from manual focus and lens control.
Do I need an app to shoot macro on iPhone? No — you can shoot macro in the stock camera on 0.5x. An app helps when you want to lock the lens, set focus manually, and confirm sharpness with focus peaking before you press the shutter.